General

DEXTools proudly welcomes X Layer to our family! With its ZK-powered Layer 2 network, X Layer bridges the OKX and Ethereum communities, forging a global on-chain ecosystem.
In this previous article, we told you everything about our close collaboration with OKX.
Now, we explain everything you need to take the first steps in X Layer with this easy step-by-step guide!
Special Offer on DEXTools!
- Celebrate X Layer’s arrival with us! DEXTools offers free social updates for XLAYER tokens for a limited time. Don’t miss this chance to showcase your project to our vast audience!
- Join the Journey: embrace the synergy as X Layer integrates into the DEXTools family. Explore the boundless possibilities of this cutting-edge network with us!
![]() Remember that with socials your token stands out, and it is more visible to our more than 20 million monthly users worldwide.
Remember that with socials your token stands out, and it is more visible to our more than 20 million monthly users worldwide.
Participation Guidelines:
- To explore X Layer and seize this special offer, fill out our online form for X Layer on DEXTools.
- Enhance your involvement in the X Layer ecosystem and receive free social updates for your XLAYER tokens.

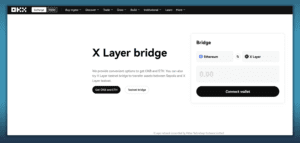
OKX X Layer Bridge
Bridging between Ethereum and the X Layer Mainnet
1- Go to the Bridge: Visit the X Layer mainnet bridge at https://www.okx.com/xlayer/bridge.
2- Choose Transfer Direction: Indicate Ethereum on the left and X Layer on the right for the transfer direction selection.

3- Connect Your Wallet: Click on the “Connect Wallet” button to establish a connection with your preferred wallet.

4- Select Token and Amount: Choose the token you wish to bridge (e.g., ETH) and input the desired transfer amount, ensuring to set aside some ETH for the Ethereum network fee.
5- Review and Confirm: Double-check all transaction details, including the token, amount, and fees. Once satisfied, click “Bridge” to initiate the transfer.

6- Finalize the Transaction: Confirm the transaction through your wallet.
![]() Transaction confirmations on the Ethereum network may take approximately 15 minutes for security purposes. Track the progress within your wallet.
Transaction confirmations on the Ethereum network may take approximately 15 minutes for security purposes. Track the progress within your wallet.

7- Track Your Transfer: Once processed, monitor the transaction’s progress in the “Pending Transactions” section of the bridge interface, or view your entire bridge transaction history.

 The process for transferring assets from the X Layer mainnet to Ethereum follows a similar procedure:
- Visit the Bridge: Navigate to the X Layer mainnet bridge at https://www.okx.com/xlayer/bridge.
- Specify Transfer Direction: Indicate X Layer on the left and Ethereum on the right for the transfer direction.
- Connect and Switch Wallet: Click “Connect Wallet” to establish a connection with your wallet. Ensure your wallet is switched to the X Layer network (if not already).
- Choose Token and Amount: Select the token for transfer and input the desired amount.
- Confirm Transfer: Review all transaction details and click “Bridge” to proceed.
- Finalize and Monitor: Confirm the transaction through your wallet. Similar to Ethereum bridging, transactions require confirmation on the X Layer network before reflecting in your Ethereum wallet. Track progress within your wallet and the bridge interface’s “Pending Transactions” section.
- Claim Your Funds: Upon completion, a “Claim” button will appear on the bridge interface. Switch your wallet to the Ethereum network and confirm the claim transaction to receive your transferred funds in your Ethereum wallet.
And that’s it, we hope you find this guide helpful. We’ll keep you informed on any updates.
Remember to prioritize security: always conduct thorough research (DYOR) before engaging in any project.
Thanks for your support and trade safely!


